
Creating Your Own MyCert Certificate & Applying It to Your OCI Load Balancer
This blog will go over the steps to download and acquire your own MyCert, using the Linux “Cygwin64 Terminal” on a Windows 11 operating system. This is a self-signed certificate and uses a private key that you generate. It is used for external clients to connect to the Oracle Cloud Infrastructure load balancer using port 443.
A. Click on the below hyperlink to install “Cygwin” on your Windows OS.
B. Once downloaded, right-click on the installation file and run it as an “Administrator”.
Click “Next”.

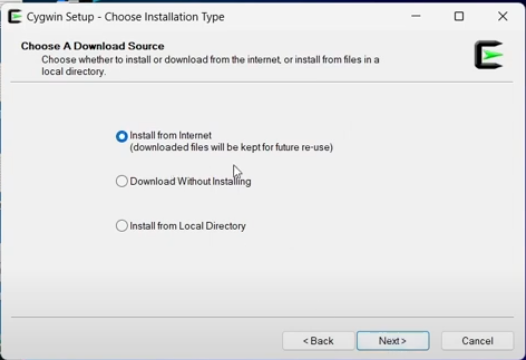
Leave it as default “Install from internet” and click “Next”.
Leave Root Directory as default “C:\cygwin64”, unless you would like the root located someone else, other than the C: drive. Also leave the “Install For” section, as default “All Users (RECOMMENDED)” and click “Next”.

Leave “Local Package Directory” as default and click “Next”.

Leave “Use System Proxy Setting” section as default and click “Next”.

Software will now start to download and install.

For the “Download Site” section, there are a lot to choose from, but we will select the most used site of “https://cygwin.mirrors.hoobly.com” and click “Next”.
Note:
If you would like to add or change download sites, you can always come back and re-run the installer.

Software will now start to download from the selected site.

Once Finish, expand the “All” package file, by selecting the “+”, followed by locating and selecting “Default”.

Locate and expand “Shells”, followed by selecting “Bash”, followed by selecting “Base, Shells” located to the right section pane and click “Next”.

Confirm installation files and click “Next”, followed by downloading final installation. Before clicking “Finish”, either leave the default checkbox checked for “Creating icon on Desktop” or deselect it, to avoid desktop icon creation.
C. Open the “Cygwin64 Terminal” and type: openssl req -newkey rsa:2048 -nodes -keyout mycert.key -x509 -days 365 -out mycert.crt
Enter the following info at each prompt:
- Country Name: US
- State or Province (full name): FL
- Locality Name (City): Tampa
- Organization Name: Oracle
- Organization Unit Name: Oracle
- Common Name: Oracle
- Common Name: Your name or Server Host Name goes here
- Email Address: Your Email Here

Type: cat mycert.key
Hit “Enter”.
Your Private Key will now be displayed

D. Copy your Private Key, from the beginning of “Begin Private Key” to the end, stating “End Private Key” and either open “Notepad” or “Notepad++ “and paste your key info. Save your key somewhere safe and be sure Not to forget were you saved it.
E. Applying your Private key MyCert to your OCI Load Balancer:
Open a web browser, preferably “Microsoft Edge”.
Login to your “OCI Tenant”, followed by navigating to “Networking” > “Load Balancers” > “Load Balancer” and select your desired “Load Balancer”.
Within your “Load Balancer Details”, scroll all the way down and to the Left-Side-Panel, under “Resources”, locate and select “Certificates”.

Under the “Certificates” drop-down menu, select “Load Balancer Managed Certificate”, followed by selecting the “Add Certificate” button.
Locate your saved Private Key file that you saved from earlier

All set.